The Soap Note Tab and Annotation View Tab provide the capability to record findings from a patient’s examination or lab visit. The resulting document is in letter form and can be used to communicate to referring physicians or to support insurance claims. The data recorded using these tabs are updated in the patient’s chart.
The Soap Note Tab provides a data entry format related to the SOAP note concept. The meaning of SOAP note is:
| 1. | S = Subjective examination of patient |
| 2. | O = Objective examination of patient |
| 3. | A = Analysis of patient’s symptoms |
| 4. | P = Plan for managing patient’s symptoms |
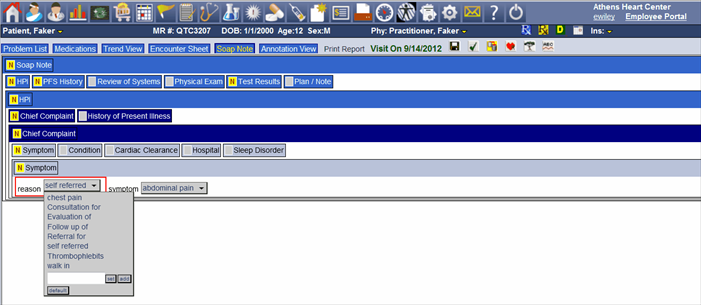
An example of the SOAP Note input format is shown in SOAP Note Encounter Figure 23.

The SOAP Note Header has One Tab Labeled Soap Note. Clicking on the Soap Note Tab will reveal Header Tabs. In this case the Header Tabs for the Soap Note displayed in Encounter Figure 23 are:
| 1. | HPI |
| 2. | PFS History |
| 3. | Review of Systems |
| 4. | Physical Exams |
| 5. | Test Results |
| 6. | Plan / Note |
These Header Tabs definitions follow the SOAP explanation above. These Header Tabs can be created specifically for any practice using an Admin function but must contain the essential SOAP information for the practice.
The SOAP Note is presented in a tree format with the bottom row of the tree containing nodes that contain selection menu lists containing most usually used words describing the examination. These words will be used to automatically create a sentence describing the condition or action to be taken with the patient. This sentence becomes part of the documentation note and the data selected from the menus will be stored in the patient’s chart file.
The Header and the Sub Header contains a yellow box or a gray box. The yellow box can contain a red “N” or “D”. “N” indicates there is data in a node within the Header or Sub Header. “D” indicates the default sentence within the Header or Sub Header. The Grey Box indicates that there is no data in the Header or Sub Header.
The expansion of one header tab may produce another header tab and so on until the bottom of the tree is reached and detail row or node can be used to enter the data. The action of the data entry node is as follows:
| 1. | Pick List Menu |
| a. | A word or a brief set of words prefix the pick list menu. |
| b. | Clicking on the pick list menu command button produces the pick list. |
| c. | Select from the pick list data that best matches the examination |
| d. | If there are none but there should be and can be used by other practitioners, then add to the list. If the word cannot be used by others as this is a special case then it to enter it to the list then select set which will cause the word to be used just this time. |
| 2. | Show Sentence based on data entered |
| a. | Double click the blue bar or the bar containing the sub header for this data node and the sentence will appear using the data selected. |
| 3. | Edit sentence |
| a. | If the sentence created is not the sentence needed the sentence can be |
edited. Double click anywhere on the sentence line and an edit dialog will appear. Edit the sentence and the sentence will be added as edited to the patient’s chart. Using the data entry mode after editing dialog will clear the edited sentence.
| 4. | Ask for the default sentence to be used. |
| a. | Clicking the Default Command button located on each of the Node Rows and will cause default sentence to be added to the node. Sometimes a node row may require multiple data entries .If this is the case there will be a repeat command button located next to the sub header name to allow repeating the node level. The undo repeat command also located on the sub header row will remove the repeat row added last. |
| 5. | Omit any data from appearing for this Node. |
a. Clicking the Omit Command button located on each sub header row will indicate no data is available for this node.
To close the Header or Sub Header, double click on the Header or Sub Header Name. To expand a Header or Sub Header double click the Sub Header or Header name.
To select a Sub Header click on the Sub Header Bar. To display the sentence created from the data entered in the node or based on default sentence double click the Sub Header Bar of the Node. If the default is selected as indicated by a red “D” and double clicking the Sub Header Bar does not produce a sentence then there is no default sentence defined for the Sub Header.
Annotation View Tab
The Annotation View is a data entry form in letter format. This is the default tab presented when the Worksheet ICON is selected or when the patient is selected by double clicking on the Exam or Lab Flow screen.

Encounter Figure 24
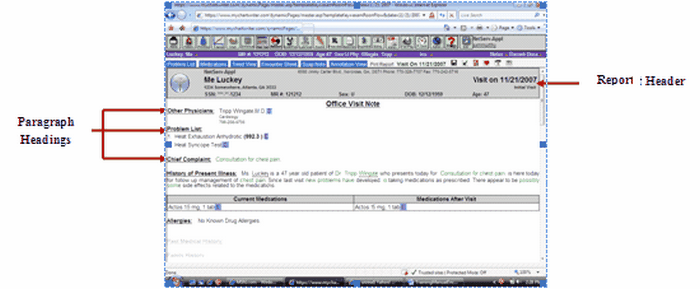
The Annotation View Encounter Figure 24 has the other TAB information combined into one TAB. It contains the Problem List Tab, Medication Tab, Soap Note Tab and provides interaction between the Encounter Sheet Tab. The Encounter Sheet and Annotation View Tab are connected by the authorization process in the Encounter Sheet. When the Encounter Sheet is authorized so is the Annotation View. Although this format is like the letter used to communicate the patient’s visit, it is also interactive with the patient’s chart similar to the way the other Tab are interactive with the patient’s chart. This interaction is provided for in several ways (See Annotation View Tab Figure 14 for references to below description):
| 1. | Report Header |
| a. | The Report Header contains demographic information about the patient and |
when clicked at any place on the header will produce a demographic dialog where the patient’s demographic information can be updated.
| 2. | Paragraph Headings |
| a. | Paragraph Headings may be bold or grayed out. If bold they usually contain detail descriptions and will be included on the printed report. |
| b. | These paragraph headings relate to information in the patient chart and will display the information if available. If there is no information available the name will be grayed out. |
| c. | Information can be added to the paragraph heading or the information already displayed can be edited. Clicking on the paragraph heading will produce a dialog box to guide the process of adding information. Also there are editing controls attached to the end of line of information previously entered. These controls can either be a box containing the letter “E” or the letter “C”. These controls are not included in the printed report. Clicking on an “E” control will produce a dialog box to help make the change or deletion. The letter “C” indicates the information line is not complete and before authorization can take place it must be corrected. Clicking on the letter “C” will produce a dialog box to allow the correction to take place. When corrected the letter “C” will be replaced by the letter “E”. |
| d. | Some paragraph headings when clicked will produce a tree-node box. The use of this box is described in Soap Note Tab. Please visit that Tab for an explanation of how the tree-node box works. |
| 3. | Table |
| a. | There is one table for recording existing medication, adding new medications, writing prescriptions. The table has two columns labeled current medications and medications after visit. |
| b. | Many times current medications may need updating as patient may be under another physician’s care for other problems since last visit. Clicking on the existing medication table heading will cause the add/edit a medication dialog to appear. How to use this dialog is explained in the Medications Tab of this chapter. To edit or delete an entry in this column click on the letter “E” at the end of the medicine description and a dialog will appear to allow change to the medicine dosage or deletion of the medicine. |
| c. | Also within the “E” letter dialog there is a selection labeled View Monogram. Clicking on this label the Monogram for the drug will be displayed. |
| d. | Current medications will be continued to be used by the patient. They can be moved to the medications after visit column. This is done by clicking the letter “E” after the medicine in the current column. The dialog with an entry labeled Continue Med. Clicking this label will copy the medicine in the current column to the medicine after visit column. Many times the entire list of medicines must be continued. In the same dialog there is an entry labeled Continue All Meds. This will copy all medicines in the Current Column to the Medicine After Visit Column. Sometimes most of the medicines but not all need to be continued, this can be accomplished quickly by copying all medicines to the Medicine After Visit Column and then deleting the medicines that will not be continued from the Medicine After Visit Column. |
| e. | As a result of this visit new medicines may be prescribed. Clicking on the column heading of medicines after visit column will display the add/edit a medication dialog. The use of this dialog is described in the Medicines Tab of this Chapter. |
| f. | Current medications can be prescribed. Clicking on the letter “E” box will display a list of actions that include the entry prescribe. Clicking on prescribe will display a dialog box where the medicine can be selected and then prescribe and the authorization dialog will appear asking for a PIN (Personal Identification Number – digital signature). It’s a good practice to edit the medicine dosage before starting the prescription process. Click on edit listing in the dialog displayed and the letter “E” box is clicked. |
| 4. | Command Button |
| a. | There is one command button labeled Edit Orders. Orders/Services can be added here using the command button. Clicking on the command button will display the Edit Order dialog form. An explanation of the use is found in the Encounter Sheet Tab of this Chapter. |