Medical Records Filing
Overview
Medical Records of Patients (or Charts) in HPN Chart are in electronic form thereby eliminating paper copies (or Hard Copies). They are held in Medical Records Repository (or Filing Cabinet.) The electronic records are created internally or externally. They are electronically or manually filed.
This is shown in Patient’s Chart Figure 12.
Internal and Electronic Reports are usually created by devices connected to desktop personal computers where the PC is connected to an internal computer network. When the device is used as part of a normal clinical exam, the resulting report is automatically sent to the electronic repository and filed under the appropriate filing TAB. Internal and Electronic Reports can also be created and automatically filed by creating a “paper” report on a computer screen and then when authorizing the report it will be automatically filed in the repository. This type of report is usually related to patient visits for examination.
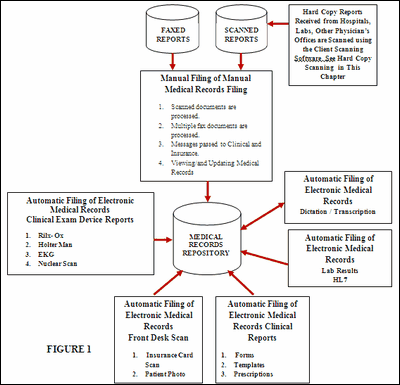
Examples of Internally Electronically created Medical Reports are:
| 1. | Clinical Exam Device Reports |
| a. | Rilx- Ox |
| b. | Holter Man |
| c. | EKG |
| d. | Nuclear Scan |
| 2. | Front Desk Scan |
| a. | Insurance Cards |
| b. | Patient Photos |
| 3. | Clinical Reports |
| a. | Forms (Lab requests) |
| b. | Templates (Soap Notes) |
| c. | Prescriptions (Prescriptions) |
External and Electronic Reports can also be automatically filed. This is accomplished by having the internal computer network connected to an external telephone data network. The Electronic Report is sent from one external computer over the telephone data network and received by another an internal computer and the report is automatically filed in the repository. Examples of this kind of Medical Reports are:
| 1. | Lab Results - HL7 |
| 2. | Dictation and Transcription |
Not all reports however are electronically created. FAX and paper reports are very common. These reports must be added to the repository to make the patient chart complete. Paper reports come by mail and FAX. FAX reports are “picture” copies of the paper report sent via a FAX machine. Although the FAX image is electronic it is only a picture similar to a photo. FAX reports are already in electronic form but must be manually filed in the repository. Paper documents must be converted to an electronic image before it can be filed in the repository. This conversion is accomplished using a scanner. Then the scanned image can be manually filed the same way the FAX image is filed.
Scanning Documents
Scanner Interface Application Description
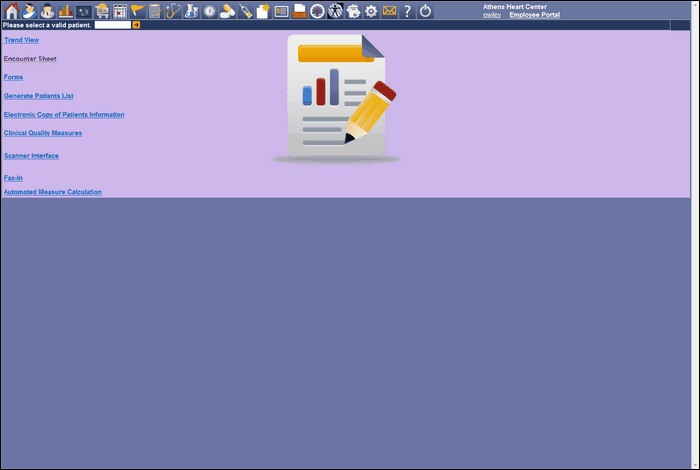
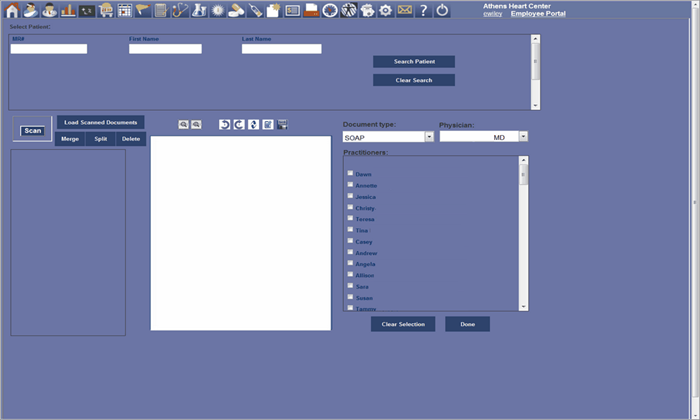
When the documents have been scanned, double click on the desktop ICON labeled HPN Chart Login and the Log In as shown on Patient’s Chart Figure 13 Enter Login Name and Password and click the Log In Button. The Scanning Interface Patient’s Chart Figure 14 will be displayed. The top line of the Scanning Interface Screen is a series of Buttons called ICON Command Bar Patient’s Chart Figure 15. A description of each Button on the ICON Command Bar follows.
![]()
File Browser ICON Button
This Button is used to change the file location for the documents available for filing into the patient’s chart. The file in use is displayed (just to the right of the About Button) in Patient’s Chart Figure 14 indicates the file being used is C:HP ScannedImages. (Shown in the red oval in Patient’s Chart Figure 14) This Button can be used to change the file location for FAXED documents. This is the default file setting when the Scanner Software is initialized.
Get Scanned Document ICON Button
The Get Scanned Images Button will retrieve the documents that have been scanned. When the Button is clicked the scanned documents will be displayed as thumbnails in the left panel (called thumbnail display panel) of the Scanner Interface Screen Figure 3. (Panel is outlined in the red rectangle in Patient’s Chart Figure 14. The red rectangle is not part of the screen but place here for illustration purposes)
Concatenate ICON Button
The Concatenate Button is used to group together multiple thumbnails into one document. A document before it is scanned may consist of multiple pages that are stapled together. As part of the scanning process, the staple is removed and the various pages are scanned separately. They appear as separate thumbnails, but must be put back together again. After performing the function of group the thumbnails (pages) back together into a single document, they must be stapled. The Concatenate Button “staples” the thumbnails (pages) into a single document multiple page thumbnail.
Delete ICON Button
The Delete Button will delete a thumbnail from the display panel. Click on the thumbnail to be deleted
Zoom Out ICON Button
This button is used to make the document image in the Document Display Panel as displayed in the Scanner Interface Figure 14 larger. This will help in reading the document.
Zoom In ICON Button
This button is used to make the document image in the Document Display Panel Interface Figure 14 smaller. This will help in reading the document.
Multiple Pages ICON Button
There are five Buttons that are used together to manage the viewing of a multiple page document. A multiple page document is the result of concatenate (stapling) single thumbnails together to form a single multiple page document thumbnail. See the explanation in Concatenate Button above. The Multiple Page Buttons are explained below with each number point represent the button counted from left to right in Figure 15.
| 1. | This Button will load the highlighted thumbnail as a multiple page document into the Document Display Panel as shown in Scanner Interface Figure 14. |
| 2. | This Button moves the document from page to page. It shows the previous page when clicked. |
| 3. | This Display Window shows the page number of the multiple page document in the display panel. Also a list of pages is shown by clicking on the down arrow in this Display Window. Selecting one of the pages will cause the page to be display in the display panel. |
| 4. | This Button moves the document from page to page. It shows the next page when clicked. |
| 5. | This Button will unload the multiple page document and return the display panel to a single page document state. |
Rotate Document ICON Button
This Button will rotate the document in the display panel 90 degrees. Sometime a document is displayed upside down in the display panel. That is because it was scanned upside down. This button will rotate the document so it right side up.
Close Button
The Close Button when clicked will close the application.
Print Button
The Print Button when clicked will cause the document in the Document Display Panel to be printed.
About Button
The About Button displays version and other information about the software application.
Processing Scanned and Fax Documents
This process starts after the documents have been received through the FAX or scanned. Follow the steps as described below:
| 1. | Using the File Browser ICON button map the fax file or scanned file to the scanner directory. |
| 2. | Click on the Get Scanned Images. The documents will be loaded into the thumbnail display panel outlined in red rectangle as in Scan Interface Patient’s Chart Figure 16. |
| 3. | Each thumbnail can represent a one page document or a page of a multiple page document. Carefully determine whether a thumbnail |
Patient's Chart Figure 16
is part of a multiple page document or a single page document. Click on first document itself not the check box to highlight it. The highlighted document will appear in the document display panel.
| a. | If it is a part of a multiple page document, highlight each subsequent page to determine which pages belong to the multiple page documents. Also make sure of the order of the pages. The pages may be mixed up during the scanning or faxing process. Once the pages and the order of the pages are identified, click the check boxes in page order, and then click Concatenate ICON Button to “staple” the pages together. Once the document is concatenated it cannot be separated into single pages. The multiple page documents will be displayed as a single thumbnail with the first page displayed. (If a document is incorrectly concatenated it must be printed, deleted, scanned and processed again.) |
| b. | If it is a single document follow the next steps. |
| 4. | Each thumbnail must be filed in the Medical Records Chart. |
| a. | Double click on the document to be filed. |
| b. | Locate the patient data from the document to help identify the patient. |
| I. | Look for an MR# |
| II. | Look for date of birth |
| III. | Look for patient’s first and last name |
| IV. | Look for social security number. |
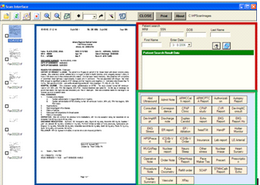
| c. | Enter the data in the fields in the box area as outlined by the red rectangle in and click search button (Button has an eye image) in the red rectangle. The patient(s) matching the entered data will display below the green bar in the red rectangle. |
| d. | Highlight the patient that matches the document. If no patient matches the document, then clear the data entered in the red rectangle by clicking the blue button in the red rectangle. Enter the data again and perform the search again. If the patient cannot be found, then print the thumbnail and delete the thumbnail from the list. A patient must be created in HPN Chart to continue. Notify the Insurance Department to add the patient. After the patient is added, then scan the printed document and process it again. |
| e. | When the patient and the document are matched then the document date must be entered in the date field in the red rectangle. This date comes from the document and represents the date service was performed which is sometimes the document date. Now its ready be filed. To do this click on a document type box as highlighted by a green rectangle. When the document type box is clicked a distribution dialog is displayed as shown in Patient’s Chart Figure 17. |
| f. | When this box appears, the document can be distributed to any person on the distribution list by clicking a check box. Most times no distribution is required. When finished with the distribution dialog, click the Done Button. The document is filed. The thumbnail is removed from the thumbnail panel. |

Patient's Chart Figure 17