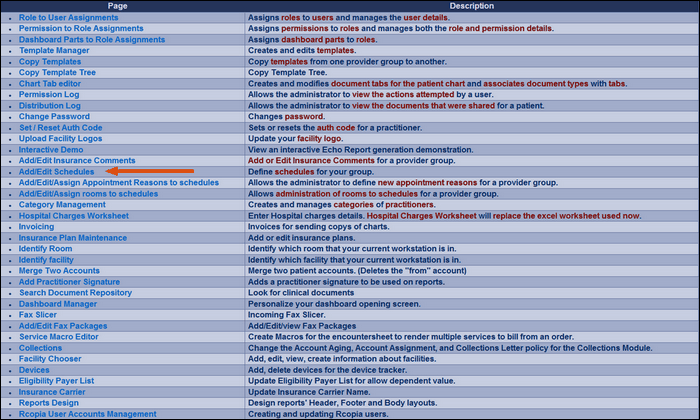
Go to the admin page and click Add/Edit Schedule
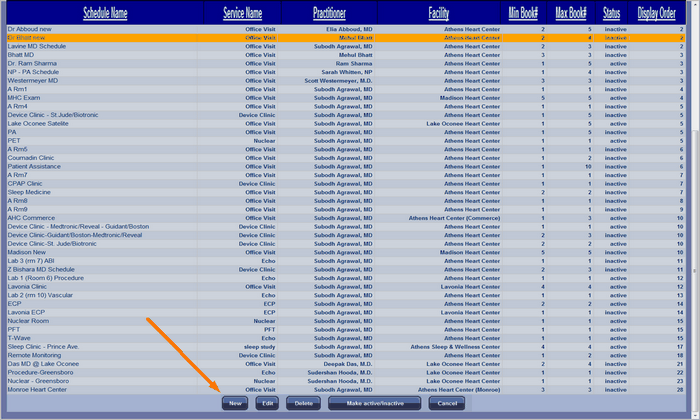
To add a new schedule scroll to the bottom of the page and click [New].
This is the new schedule dialog box. Included in making a new schedule is the following information:
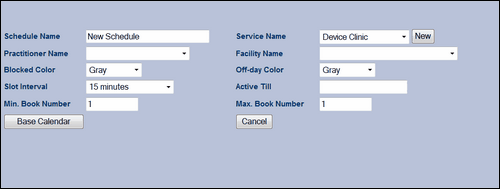
Schedule Name |
This is how the name on the schedule screen will read.
|
Service Name |
This is the type of service the schedule is used for.
|
Practitioner Name |
This designate the Practitioner associated with this schedule. This features allows a practice to isolate each practitioners schedule for less confusion.
|
Facility Name |
This is to designate the facility where this schedule is used.
|
Blocked Color |
Once the schedule is active all blocked appointment slots will be this color.
|
Off-day Color |
Once the schedule is active all off-days will be this color.
|
Slot Interval |
This is the time of each appointment slot.
|
Active Till |
As long as the schedule is active, this slot will remain blank. Enter a date and time to make this schedule inactive at a certain time.
|
Min. Book Number |
This is the minimum number of booked slots for one hour of the schedule.
|
Max Book Number |
This is the maximum number of booked slots for one hour of the schedule. |
Once all of this information is entered, click [Base Calendar] to set up the days for the schedule.
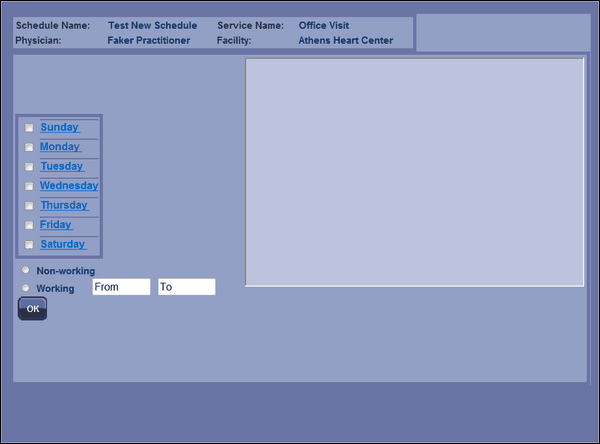
Check beside each day included in the new schedule, and add the time. For the time, enter the time as 24 hour time format, as follows. If the day schedule works from 8 am to 5 pm enter the time as 800 and 1700. Click on the day to manage the schedule.
The "Add/Edit Schedules" section of "Admin" allows us to create and modify schedules.
Here, after opening the "Add/Edit Schedules" window, we've selected the "Procedure Room" schedule and clicked on "Edit." The attributes entered here affect how the schedule appears in the main scheduler where we enter patient appointments.
After we've assigned the basic attributes to the schedule, we need to designate each day of the week as working or non-working. Click on the day to see its current status. The non-working button affects the entire day. The working button requires a time range. Use the 24 hour form of time notation (i.e. 5:00 PM is 17:00).
There can only be one time range for a day, it can't be split. However, for times that we don't want appointments scheduled, we can block them. We can also reserve times for specific appointments.
To set several days to the same status, select them using the check boxes to the left. To apply the setting, click on "OK." (The submit button is for the right section of the screen and does not affect these settings.)
Once we've set the active time range, we can block or reserve special time ranges. In right section of the window, we selected "Block" and entered the text we want to appear in the blocked times. Now, is when we use the "Submit" button.
Note: Appointments can be made over Blocked and Reserved times.
Blocks of time may also be designated for certain types of appointments. Here we want to designate 10:00 for a stress test. First we selected the 10:00 appointment. After that, we clicked "Reserve" and then clicked on the dropdown field. The list that appears comes from the appointment types associated with the "Procedure Room." (We'll cover setting associations in the next chapter. If you want to go there now, click here: Appointment Reasons)
Now, we'll select "Stress Echocardiogram - Global" and click on "Submit."
The 10:00 appointment slot is now shown as reserved for a stress test.
Notice that, although we had selected only the 30 minute long, 10:00 slot, an hour was reserved. That's because, when we created that appointment reason, we designated the normal length of that type of appoint as one hour.
Click "Done" to return to the "Schedules" screen. At the "Schedules" screen, click "Cancel" to return to the "Admin" section.