|
The Encounter Sheet is the Super Bill Interface for filing Insurance Claims. The purpose of the sheet is to provide supporting information for the Super Bill and help ensure the accuracy of the billing. The Encounter Sheet is tied to the SOAP note. Data can be transferred from the Problem entries to the Encounter Sheet and Orders/Services will automatically be recorded in the SOAP note. The Encounter Sheet entries for Diagnosis and Orders/Services will be matched to reduce billing errors. Insurance claims will generally not pay for Orders/Services unless they match a Diagnosis.
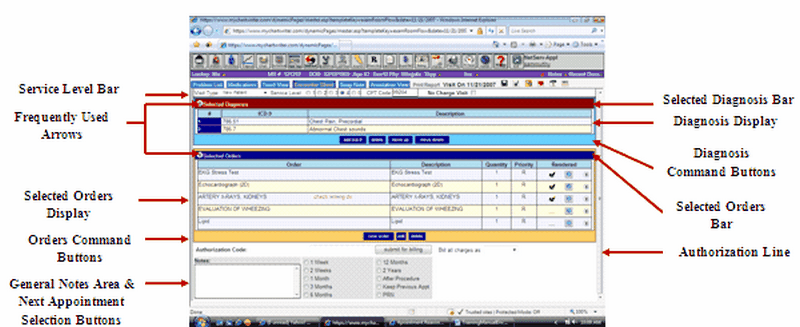
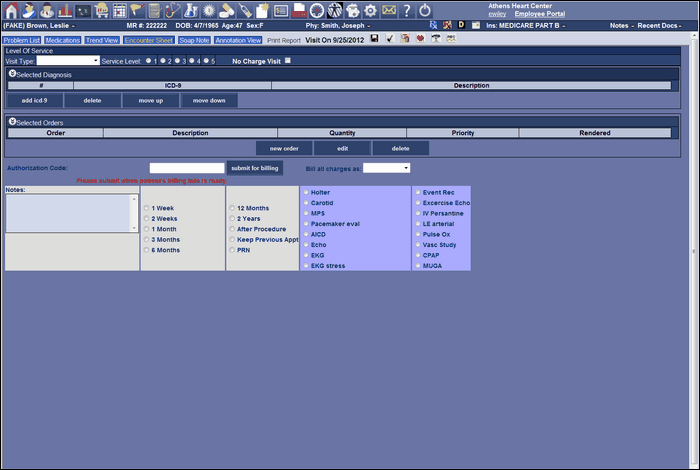
The Encounter Sheet Encounter Figure 16 is made up of various parts including the Service Level Bar, Service Diagnosis Bar, Selected Orders Bar, Authorization Line and General Notes Area and Next Appointment Selection Buttons. The Service Level Bar and Selected Orders Bar has Frequently Used Arrows.
Service Level Bar
The service level bar is made up of a pick list menu, radio buttons, display box and a check box. This area is used to select the service and level of service provided to a patient. An explanation of the use of these items is as follow:
| a. | There are three selections in the Pick List Menu. They are New Patient, Established Patient, and Consultation. When one of these is selected the CPT Code Display Box will contain the CPT Code. This Code will be used to determine the charge for the patient’s visit. |
| 2. | Service Level Radio Buttons |
| a. | There are five levels of service for each of the Visit Type selected. The selection of the radio button from one to five will change the CPT Code and the corresponding billing rate. One is the lowest rate and five is the highest rate. |
| a. | As a result of the selection of visit type and level of service a CPT code will be displayed in this Box. |
| 4. | No Charge Visit Check Box |
| a. | If the visit is a NO Charge Visit, then this box must be clicked otherwise the visit will be billed. |
Selected Diagnosis Bar
When a visit takes place, diagnosis will also be identified. A diagnosis is related to the Visit Type and Level or Service. This provides detail description for the billing of insurance claims. Under the Selected Diagnosis Bar there is a Diagnosis Display Panel that lists the Diagnosis. Sometimes when the Encounter Sheet is first opened, there may be Diagnosis already listed. They have been placed there by adding a Problem or an Impression when using the Annotation Tab. This panel displays the ICD-9 code and its description. Additional Diagnosis can be added to the Diagnosis Display Panel. This can occur in three ways:
| 1. | Using Frequently Used Arrows |
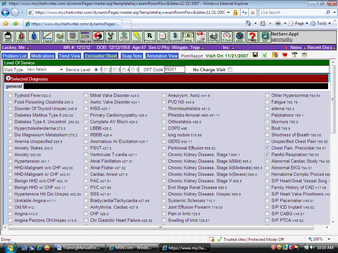
| a. | Clicking the Frequently Used Arrows (Encounter Sheet Figure 6) located on the Selected Diagnosis Bar will produce a list of frequently used diagnosis (Encounter Sheet Encounter Figure 17). The diagnosis list has a check box preceding the description. |
| b. | The diagnosis listed in the Diagnosis Display Panel before clicking on the Frequently Used Arrows will already be checked. Clicking on a check box already checked will uncheck the diagnosis and remove the diagnoses from the Diagnosis Display Panel lists. |
| c. | Clicking on a blank check box will caused the diagnosis to be added to Diagnosis Display Panel. |
| d. | Clicking the Frequently Used Arrows again will dismiss the diagnosis list. |
| 2. | Using add icd-9 Command Button |
| a. | Clicking the add-icd-9 Command Button located on the Diagnosis Command Button row (Encounter Sheet Encounter Figure 16) will produce an ICD-9-CM Code Dialog Screen. The operation of this screen is explained after Encounter Sheet Tab Section. |
| b. | When the ICD-9-CM code has been located and highlighted, clicking the Done Command Button will add this code on the Diagnosis Display Panel. |
| 3. | Return to SOAP note using the Annotation Tab |
| a. | Returning to the SOAP note and adding the required diagnosis as a Problem or an Impression will provide the capability to post the diagnosis to the Encounter Sheet. See the description under the Annotation Tab in this chapter. This ensures that the diagnosis appear in the SOAP note as well as the Encounter Sheet. |
There are four Command Buttons at the bottom of the Diagnosis Display Panel. They are add, ICD-9, delete, move up, and move down.
| 1. | Add ICD-9 Command Button |
| a. | Using this button produces ICD-9-CM Code Dialog screen. See explanation of the use of the screen at the end of the Encounter Sheet Tab function. This screen can be used to add a diagnosis to Diagnosis Display Panel. |
| a. | Using this button will delete a selected diagnosis from the Diagnosis Display Panel. |
| a. | Using this button will move the selected diagnosis up one row on the Diagnosis Display Panel. |
| 4. | Move Down Command Button |
| a. | Using this button will move the selected diagnosis down one row on the Diagnosis Display Panel. |
Selected Orders Bar
Services/Orders are related to a diagnosis. Service/Orders can be billed to insurance companies as part of the patient’s visit. Services/Orders can be performed by outside providers and the outside provider will bill the insurance companies directly for the services performed. Usually if a service/order cannot be related to a diagnosis, it will not be paid by the insurance company. Services can be added using the Frequently Used and the command buttons related to the Selected Orders Bar. When the Encounter Sheet Tab is first opened, some service/orders may already be listed in the Selected Orders Display Panel (Encounter Sheet Figure 6). These may have been entered using the Annotation Tab and added using the Impression Section of the Annotation Note. Service/Orders can be added several ways:
| 1. | Using Frequently Used Arrows |
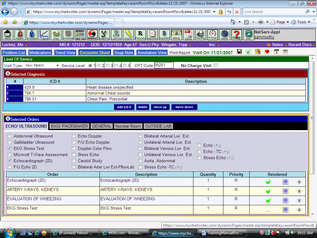
| a. | Clicking the Frequently Used Arrows (Encounter Sheet Encounter Figure 16) located on the Selected Orders Bar will produce a list of frequently used orders/services (Encounter Sheet Encounter Figure 18). Orders are categorized by various tabs. Selecting the proper tab will display orders related to the tab. The orders in the list have a check box preceding the description. |
| b. | The Orders listed in the Orders Display Panel before clicking on the Frequently Used Arrows will already be checked. Clicking on the checked Orders will uncheck the box and remove those orders from the Selected Order List. |
| c. | Clicking on a blank check box will caused the diagnosis to be added to Selected Orders Display Panel. |
| d. | Clicking the Frequently Used Arrows again will dismiss the Orders list. |
| 2. | Using New Order Command Button |
| a. | Clicking the New Order Command Button located on the Select Order Command Button row (Encounter Sheet Encounter Figure 16) will produce a CPT/HCPCS Code Finder Dialog Screen. The operation of this screen is explained after Encounter Sheet Tab Section. |
| b. | When the CPT/HCPCS code has been located and highlighted, clicking the Done Command Button will add this code on the Diagnosis Display Panel. |
| 3. | Return to SOAP note using the Annotation Tab |
| a. | Returning to the SOAP note and adding the required Service/Order as an Impression will provide the capability to post the service/order to the Encounter Sheet. See the description under the Annotation Tab in this chapter. This ensures that the service/order will appear in the SOAP note as well as the Encounter Sheet. |
There are three Command Buttons at the bottom of the Selected Orders Display Panel. They are add new order, edit and delete.
| 1. | New Order Command Button |
| a. | Using this button produces CPT/HCPCS Code Finder Dialog screen. See explanation of the use of the screen at the end of the Encounter Sheet Tab function. This screen can be used to add a diagnosis to Selected Orders Display Panel. |
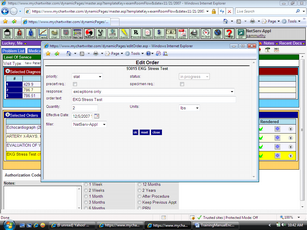
| a. | Using this button produce an Edit Order Dialog screen (Encounter Sheet Encounter Figure 19). Using this dialog screen, the order can be edited. |
| a. | Using this button will delete a selected diagnosis from the Selected Orders Display Panel. |
Selected Orders Display Panel
The Selected Orders Display Panel shows services/orders for a patient. Additional information is displayed including Order Name, Order Description, Quantity, Priority, and Rendered. A description of each appears as follows:
| 1. | Order Name – Label given to the order. |
| 2. | Description – Usually the same as the label given to the order, but can contain more information. |
| 3. | Quantity – Number of occurrences the order can be given. |
| 4. | Rendered - Can contain three ICONS |
| i. | This indicates the order has been rendered. |
| i. | Clicking the blue cross will cause the order to go into rendered state. |
| ii. | Also a check is performed to determine if the order has been properly linked to a diagnosis. |
| i. | This will display the detail row(s) of the order. The detail row contains addition information and command buttons (Order Details Figure 10) |
| a. | Add New Service Rendered |
| i. | Clicking this button will display CPT/HCPCS Code Finder Dialog screen. The operation of this screen is explained after Encounter Sheet Tab Section. |
| i. | The None Button may contain the word none or a blue block with a white number. |
| ii. | If the block contains the word “none” then the order detail is not linked to a diagnosis. |
| iii. | Clicking on the NONE Button will cause an ICD-9 code to appear where CPT diagnosis codes and description will be listed. Selecting the empty check box will cause the diagnosis to be linked to the order detail and the line number in color white to appear in a blue box. |
| c. | Edit- Clicking the edit button provides an Edit dialog screen for the details of the order. |
| d. | Delete- Clicking the Delete Command Button will delete the detail order line. |
2. Information
| b. | Detail Line of Order Description |
| c. | Number of Units performed |

Authorization Line
The authorization line is effectively adding a signature to the document. In this case it is an electronic signature. The document must be authorized by a practitioner before it can be added to the patient’s chart. There can be two types of signatures depending on the practitioner role. Sometimes a document may pre-authorize the document indicating that the document has been reviewed for accuracy thereby waiting for the authorization step to take place.
The authorization line has two fields, one to the left of a Command Button labeled Submit for Billing and the second labeled as Bill all charges as. Enter a 4 digit PIN (personal identification number – digital signature) in the first field. Select from the pick menu the name of the person the billing is credited to. Then click the Submit for Billing Command Button.
General Notes Area & Next Appointment Selection Buttons
This area is used to communicate and document the next step for the patient such as next appointment or communicate any other information to the patient. It’s made up of two or more parts. There is a general note box where any text can be entered. Another is Next Appointment Radio Buttons. Selecting a next appointment radio button will cause the appointment to be recorded in the general note text box.
ICD-9-CM Code Finder
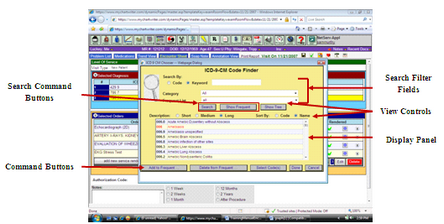
This Code Finder is used many places in the Encounter Sheet. The Code Finder as shown in ICD-9-CM Code Finder Encounter Figure 21 is used to search the data base lists of diagnosis codes. The screen is made up of four areas. The first area is the Search Filter Fields and Command Buttons. The second area is the view controls. The third area is the display panel. The fourth area is the Command Buttons. See ICD-9-CM Code Finder Encounter Figure 21.
Search Filter Fields
The Filter Fields are as follows:
| a. | This is a radio button when clicked will cause the search for the keyword entered in the Search by Entry Field |
| a. | This a radio button when clicked will cause the search for the ICD-9 code entered in the Search by Entry Field |
| a. | The keyword or ICD-9 code is entered for the search. |
| a. | The search can be performed against the entire ICD-9 database or a category of the database. To search against the entire database the “ALL” option is used. Otherwise to select a category use the down arrow to display a pick list where the category can be select. |
| a. | The frequent list is a subset of the ICD-9 code database used by the clinic. This subset can be searched instead of the entire database. This subset has categories that can be selected using the down arrow to display the pick list of categories. |
Search Command Buttons
There are two Search Command Buttons as follows:
| a. | Clicking on the search command button will cause a search of the ICD-9 database or its subset as defined by the Search Filter Fields and display any matches. |
| 2. | Frequent List Command Button |
| a. | This button will display the Frequently Used ICD-9 based on the ‘ALL” filter. This is a quick way to display the Frequently Used List without setting the filter fields. |
View Controls
There are three view controls. They are as follows:
| 1. | Show Tree Command Button |
| a. | This Button will cause the entire tree of related ICD-9 codes that will aid in identifying the correct code. This button is used by selecting a code from the Display Panel and then clicking on the Show Tree Button. A view screen will appear with a tree of all codes related to the code selected. |
| 2. | Description Short Medium Long Radio Buttons |
a. There are three descriptions of the ICD-9 codes within the database. By default the Long description is displayed. The description size can be changed by selecting one of the Description Radio Buttons. The display will change accordingly.
| 3. | Sort by Name or Code Radio Buttons |
a. The sequence of the ICD-9 codes can be changed by selecting one of the Sort By Radio Buttons. Selecting the Name Radio Button will display the results of the search in ascending sequence. Selection the Code Radio Button will display the results by code in numeric sequence.
Display Panel
This displays the result of the ICD-9 code search it shows the ICD-9 code and description.
Command Buttons
There are five command buttons as follows;
| a. | Selecting a ICD-9 code from the display panel and clicking the Add to Frequent Command Button will display a Dialog where either the general Frequent List can be selected or a subset category list can be selected. A selection from the Display Panel must be made from a search result of the category list. |
| a. | Selecting a ICD-9 code that was a result of a Frequent search from the display panel and clicking the Delete From Frequent Command Button the selected ICD-9 code will be deleted. |
| a. | This command will provide the ability to select multiple ICD-9 codes to be listed in Encounter Sheet without dismissing the search function and then restarting the function. Select an ICD-9 code and Click the Select Code(s) command button. Perform another search, then select an ICD-9 code and click the Select Code(s). Repeat this process until all selections have been made, the click the Done Command Button. |
| a. | Click this command button will transfer any selected ICD-9 code to the diagnosis list of the Encounter Sheet and the ICD-9-CM screen will be dismissed. |
| a. | Click this command button will dismiss the ICD-9-CM screen without any action. |
CPT / HCPCS Code Finder
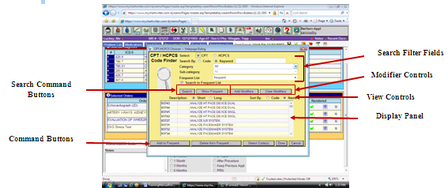
This Code Finder is used many places in the Encounter Sheet. The Code Finder as shown in CPT / HCPCS Code Finder Encounter Figure 22 is used to search the data base lists of diagnosis codes. The screen is made up of four areas. The first area is the Search Filter Fields and Command Buttons. The second area is the view controls. The third area is the display panel. The fourth area is the Command Buttons. See CPT / HCPCS Code Finder Encounter Figure 22.
Search Filter Fields
The Filter Fields are as follows:
| a. | This is a radio button control that causes the search to take place using the CPT database or the HCPCS database. |
| a. | This is a radio button when clicked will cause the search for the keyword entered in the Search by Entry Field. |
| a. | A radio button when clicked will cause the search for the CPT / HCPCS code entered in the Search by Entry Field. |
| a. | The keyword or CPT / HCPCS code is entered for the search. |
| a. | The search can be performed against the entire CPT / HCPCS database or a category of the database. To search against the entire database the “ALL” option is used. Otherwise to select a category use the down arrow to display a pick list where the category can be selected. |
| a. | The Sub Category is a subset of the Category database of codes. This subset can be searched instead of the entire database. After the Category is selected, the down arrow can be used to display a pick list of sub categories. |
7. Search Frequent Check Box
| a. | Clicking this check box will cause the search to be performed on the Frequent List. |
Search Command Buttons
There are two Search Command Buttons as follows:
| a. | Clicking on the search command button will cause a search of the CPT / HCPCS database or its subset as defined by the Search Filter Fields and display any matches. |
| 2. | Frequent List Command Button |
| a. | This button will display the Frequently Used CPT /HCPCS based on the ‘ALL” filter. This is a quick way to display the Frequently Used List without setting the filter fields. |
Modifier Controls
There are two Modifier Controls as follows:
| a. | Clicking this Button after selecting the CPT /HCPCS codes from the Display Panel will display a Dialog of Modifier Codes. Select the appropriate modifier and clicking OK on the Dialog will cause the selected modifier to be added to CPT /HCPCS code(s). |
| a. | Selecting CPT / HCPCS codes with modifier codes from the Display Panel and then clicking the Clear Modifier will remove the Modifiers. |
View Controls
There are three view controls. They are as follows:
| 1. | Description Short Long Radio Buttons |
| a. | There are two descriptions of the CPT / HCPCS codes within the database. By default the Long description is displayed. The description size can be changed by selecting one of the Description Radio Buttons. The display will change accordingly. |
| 2. | Sort by Name or Code Radio Buttons |
| a. | The sequence of the CPT / HCPCS codes can be changed by selecting one of the Sort By Radio Buttons. Selecting the Name Radio Button will display the results of the search in ascending sequence. Selection the Code Radio Button will display the results by code in numeric sequence. |
Display Panel
This displays the result of the CPT/HCPCS code search It shows the CPT / HCPCS code and description.
Command Buttons
There are five command buttons as follows;
| a. | Selecting a CPT / HCPCS code from the display panel and clicking the Add to Frequent Command Button will display a Dialog where either the general Frequent List can be selected or a subset category list can be selected. A selection from the Display Panel must be made from a search result of the category list. |
| a. | Selecting a CPT / HCPCS code that was a result of a frequent search from the display panel and clicking the Delete From Frequent Command Button the selected CPT /HCPCS code will be deleted. |
| a. | This command will provide the ability to select multiple CPT / HCPCS codes to be listed in Encounter Sheet without perform dismissing the search function and then restarting the function. Select a CPT / HCPCS code and Click the Select Code(s) command button. Perform another search, then select a CPT / HCPCS code and click the Select Code(s). Repeat this process until all selections have been made, the click the Done Command Button. |
| a. | Click this command button will transfer any selected CPT / HCPCS code to the Orders/Service list of the Encounter Sheet and the CPT / HCPCS screen will be dismissed. |
| a. | Click this command button will dismiss the CPT / HCPCS screen without any action. |
| 


