Forms Creation Module as described in the Administration Manual is used to create forms to be included in the Forms populated in the Forms Manager screen. Forms from various different LABS, Hospitals, Internal Forms, and etc. can be copied and adapted by the Forms Creation Module to allow demographic information to be automatically updated in the Form and allow online entry of variable information. This greatly simplifies creating and sending orders to hospitals and labs. The Form must be created using the Forms Creation Module and loaded into the Form Manager and then be used as described here.
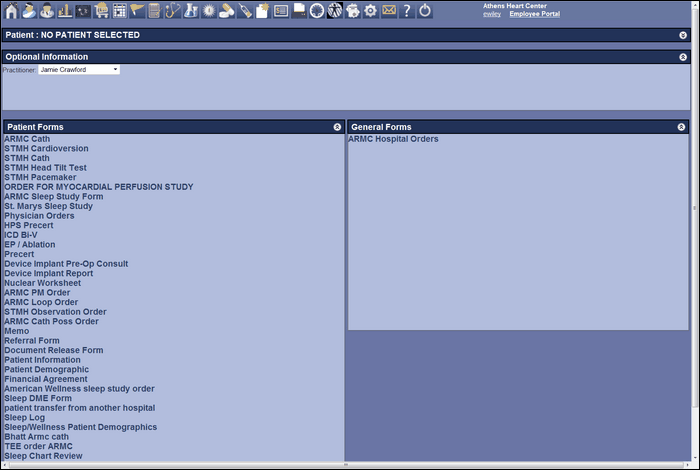
The Forms screen contains three panels.

The first panel labeled Patient Chooser Panel and outlined in red. The Second Panel labeled Optional Information Panel and outlined in blue. The third panel labeled Forms Selection Panel and outlined in green. The Forms selection panel has two divisions. One division is labeled Patient Forms and the other division is labeled General Forms.
Patient Chooser Panel
When the Forms Manager is first displayed the Patient Chooser Panel is collapsed. The green bar of the panel displays “NO PATIENT SELECTED” on the left side of the green bar. The right side of the green bar has a white arrow pointing down. Clicking on the white arrow will cause the Patient Chooser Panel to expand and show the patient selection details. In the patient chooser panel, the demographic data for a patient that is required for the form is identified. Follow the following steps to identify the patient demographics.
1. There are five fields labeled MR#, First Name, Last Name, Date of Birth (DOB), and Social Security Number (SSN).
| 2 | Enter data in at least one of the fields. Click the Search Button. |
| 3. | A list of patients matching the search will be listed in the panel. If the list is large or no patient is listed enter data in a different field and enter data in more than one field. |
| 4. | Select the patient from the list and the patient’s name will appear in the at the left of the Green Bar. |
Optional Information Panel
The Optional Information Panel is used select a Practitioner. Some forms do not require the name of the Practitioner. In that case the Panel will not be used.
When the Forms Manager is first displayed, the Optional Information Panel is expanded. The green bar of the panel displays “OPTIONAL INFORMATION” on the left side of the green bar. The right side of the green bar has a white arrow pointing up. Clicking this white arrow will cause the Optional Information Panel to collapse. With the Optional Information Panel in the expanded mode, selection of the Practitioner is as follows:
| 1. | There is a field labeled Practitioner followed by a down arrow. |
| 2. | Click the down arrow and a pick list will appear. |
| 3. | Select the practitioner from the pick list. |
Forms Selection Panel
The Forms Selection Panel has two panels with a display window. The left panel is labeled Patient’s Forms. The right panel is labeled General Forms. The difference between the two forms is forms patient forms when completed and submitted will be automatically filed in the patient chart. The general forms when completed and submitted will be automatically stored for FAX distribution.
To display and complete a form follow these steps.

| 1. | Double Click on one of the forms from the panel after completing the selection from the Patient Chooser Panel and the Practitioner Panel. |
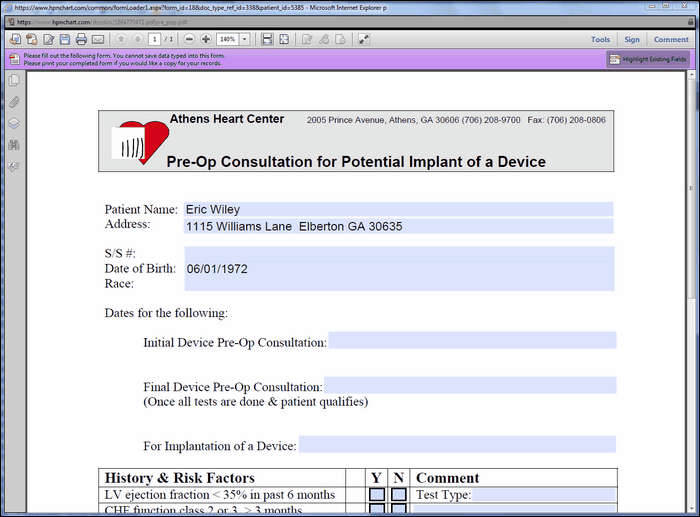
| 2. | The form will appear with the demographics filled in as shown in Forms Manager Figure 2. |
| 3. | When completed. A form can be saved, submitted or printed. Scroll down to bottom of the form and a Submit Button, or and a SAVE Button will appear. |
| 4. | Click the Submit Button and the Form will be filed in the patient’ file. If the Submit Button is not present, Click the Save Button and the document will be saved on the PC desktop. |
| 5. | If there is no Submit Button or the Save Button is grey- out , then the document can only be printed. In this example the document can only be printed. Notice the purple bar at the top of the document in Forms Manger. |