Alternative Methods for Making, Rescheduling and Canceling Appointments
Appointments can be made directly from the Appointment Scheduling Screen by performing two steps.
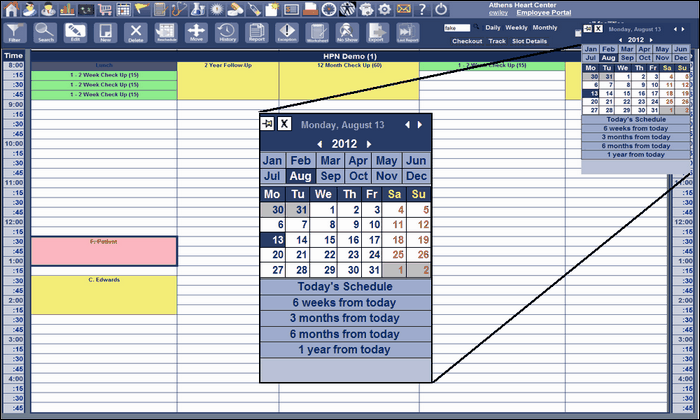
| 1. | First the Appointment Schedule must be set at the date of the appointment. This process is described in Schedule Ribbon – Calendar ICON section of this manual. |
| 2. | Second step is double clicking the desired appointment slot. |
| 3. | Make an appointment screen will appear. |
Appointments can be canceled, rescheduled, and deleted directly from the Appointment Scheduling Screen by performing the following step.
| 1. | Click on the patient’s appointment slot then click the Delete ICON, Reschedule ICON or Move ICON. The process for each of the ICON’s is described in Schedule ICON Function Bar section of this manual. |
Make the Appointment in HPN Chart
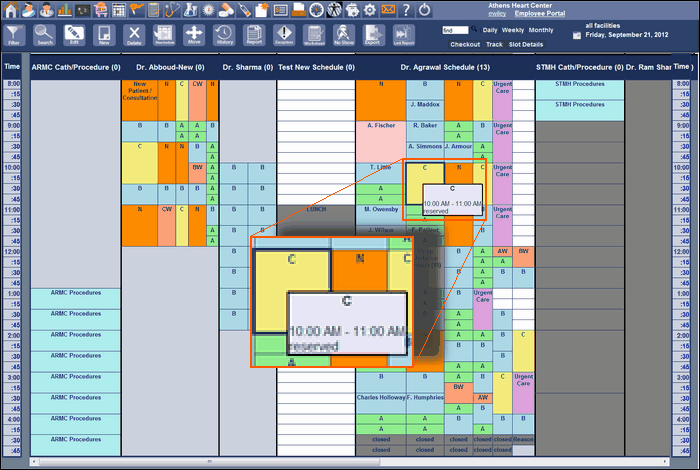
| 1. | Access by clicking the Schedule Icon. The appointment screen for Today’s Date will appear as shown above. |
| 2. | On the appointment screen select an open slot. Booked slots will have a patient name in them, so select any other box. The schedule should be checked to make determine if the patient has any open appointment that may conflict with the new appointment. To do this, click the History Icon on the Appointment Scheduling Screen. The location of the ICON is shown in Front Desk Figure 12. |
| 3. | To make an appointment click on the History ICON as shown in Front Desk Figure 3. The Patient Appointment Search Screen will appear. The appointment is made by completing this screen. See Front Desk Figure 6 Patient Appointment Search Screen. Enter the patient’s last name and click Search Button. |
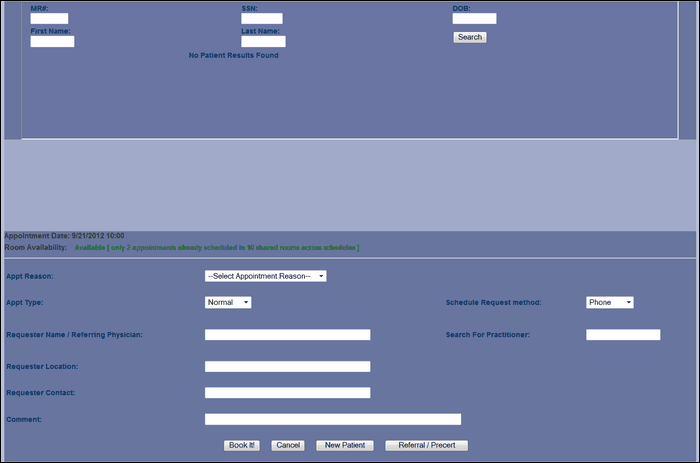
| 4. | The results of the search will appear in the lower half of the screen as shown in Front Desk Figure 7 Appointment Search Screen. This screen confirms no appointments are scheduled for this patient. Click on the Search Appointment Button on bottom of Appointment Search Screen. Front Desk Figure 8 Appointment Search Screen will appear with patient’s information filled in. |
| 7. | Complete the date range, time preference, day and time preference, and match criteria. It is suggested to select “All Available Slots”. Select Service Name from drop down box. Select location for service from drop down box. Your location is automatically shown. Select Physician from drop down box. Select the Appt Reason. Add any comment about the appointment. Click the Search Button. |
| 8. | The Appointment Search Screen Front Desk Figure 9 will now contain a scroll down box at the bottom of the screen that contains a list of open appointment slots matching the search criteria. Select the open appointment from the list and click the Book Button as shown in Appoint Search Front Desk Figure 10. You can change the search criteria for date and time day range and click search again until you find the appointment needed. |
| 9. | You can also make an additional appointment for the same day when the patient needs to see another physician or have a test performed. This is done by clicking the Repeat Button. The appointment scroll box will change and two appointments will be shown. See Appointment Search Screen Front Desk Figure 10. Select the appropriate appointment line as required and click the Book Button. If the decision to remove the repeated appointment, then click the Undo Button and the screen will return to look like Front Desk Figure 9. |
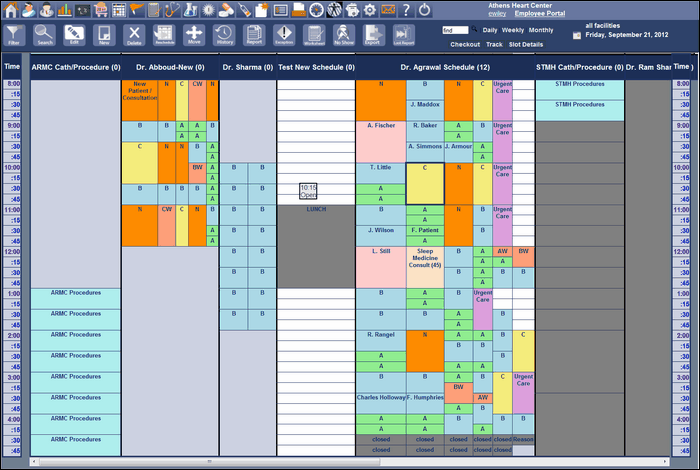
| 10. | The Appointment is now in the appropriate time slot on the Appointment Scheduling Screen Front Desk Figure 11. The appointment slot is shaded pink color. |
Existing Patient Appointment
The request for an appointment can be made by a referring physician, the attending physician as a result of a current appointment or from the patient. This is accomplished as follows:
| 1. | To make the appointment for an existing patient, click the Schedule ICON. This will display the Appoint Scheduling Screen for the current day as shown in Front Desk Figure 12 Appointment Schedule. |
| 2. | Clicking the History ICON will display the Patient Appointment Search Screen as shown in Front Desk Figure 13. Enter the patient’s last name and click the Search Button at the top of the screen. |
| 3. | The screen will display any appointments that exist for the patient in two categories. Pending appointments are future appointments and Past appointments any appointment prior to Today’s Date that are still open. Based on this information, you can proceed to make a new appointment. To change or delete a pending appointment see the section of this chapter labeled Reschedule or Cancelling an Appointment. |
| 4. | To make an appointment click on Search Appointments Button on the bottom of screen. Then follow steps 5 through 8 of the Existing Patient section of this chapter. (The immediate previous section). |
Reschedule or Cancelling an Appointment
Changing or cancelling an appointment is required for many reasons. To change or cancel an appointment:
| 1. | Follow steps 1 through 4 of the Existing Patient Section of this Chapter. (The immediate previous section). The screen shows Pending Appointments. Select the appointment to be Rescheduled or Cancelled. |
| 2. | To cancel the appointment, click the Cancel Appt Button on the bottom of the screen. A pop-up dialog will appear requesting the reason for the cancellation. See Patient Appointment Search Screen Front Desk Figure 14. |
| 3. | Enter the Reason and click the Update Button. The cancellation has taken place. |
| 4. | To reschedule an appointment, perform step 1 in this section. Click the Reschedule Button. The Appointment Search Screen Front Desk Figure 15 will be displayed. Notice this screen is prefilled with the existing appointment information and setup to search for available appointment slots. Change the search criteria information as required looking for an open appointment slot that will satisfy the patient. |
| 5. | Click the Search Button and the available appointment slots meeting the criteria will be shown. This is shown in Appointment Screen Front Desk Figure 16. |
| 6. | Select the appointment and then click the Reschedule Appt Button. The appointment has been rescheduled. |